Android is popular for its ability to be customized, allowing two phones from the same company to look the same but have different user interfaces. Flashing a device is a simple process of installing a custom ROM, which changes the version of Android on the device to a modified version from the manufacturer or the Android community.

- Part 1. Reasons & Risks of Flashing Android Phone
- Part 2. Preparation Before Flashing Android Phone using PC Software
- Prerequisite 1: Installing USB Drivers
- Prerequisite 2: Unlocking the Bootloader
- Part 3. How to Flash Android Phone using PC Software
- Method 1: Flashing via iMyFone Fixppo (Easiest + Fastest)
- Method 2: Flashing via SP Flash Tool (MediaTek Devices) (Difficult)
- Method 3: Flashing via Odin (Samsung Devices) (Difficult)
Part 1. Reasons & Risks of Flashing Android Phone
Flashing your device can be an exciting process, but it’s important to be aware of the reasons why someone might want to flash their device and the risks associated with doing so. Flashing your device can allow you to customize it in a way that was not possible before, as well as allowing you to install custom ROMs or kernels. It can also allow you to upgrade your device to the latest version of its operating system, allowing you to take advantage of the latest features and security updates. However, flashing your device can also void your warranty and can cause irreparable damage to your device if not done correctly. It’s also important to know that flashing your device can potentially wipe all of your data, so it’s important to back up your data before you flash. It’s also important to research the flashing process for your specific device, as the process will vary depending on the device. All in all, flashing your device can be a great way to customize your device and take advantage of the latest features, but it’s important to be aware of the risks associated with it.
- Bloatware: One main reason to flash your device is to remove any bloatware that comes with the device. As you are installing a custom ROM, you will be able to remove the bloatware.
- Customization: A new ROM may allow you to customize your device to the most precise detail you want. It will also give your phone a different feel.
- Performance: Normally, you would not be able to change how your CPU and GPU behave. However, a custom ROM may allow you to overclock your CPU and GPU to optimize the performance of these components for activities such as gaming. Battery life can also be increased as background activity can be reduced when the device is not being used.
- Updates: Most Android devices will stop receiving updates after a few years of release but if you install a community made custom ROM, you will be receiving updates more often and for longer.
All of this does come with some risks that you should carefully consider before flashing your device.
- Malfunctions: Some device features, such as some preinstalled applications may not be compatible with the custom ROM so they will not be able to function.
- Warranty: Flashing your phone will almost always void your warranty. The manufacturer will not repair an issue with the device even if it is not related to the installation of a custom ROM.
- Compatibility: Especially for less popular devices, not all custom ROMs may be compatible with your device.
Note: You WILL lose all data on your device when flashing the device. Make sure you create a backup of all the data on your device separately.
If you want to know how to flash the android phone with a computer, this article will show you how to flash your android device using iMyFone Fixppo, SP Flash Tool, and Odin. The Fixppo software is the easiest and fastest method for any user to repair a dead device and flashing firmware onto it. It automatically downloads the firmware, which means you are not at risk of downloading malicious software. It also completes the difficult steps required when using software such as Odin (see further below) so that you can repair your device as soon as possible.
Part 2. Preparation Before Flashing Android Phone using PC Software
Check the requirements below before you start to flash your phone.
- The device you want to flash
- PC
- USB Cable for your device
- Unlocked Bootloader
- Flashing software
- Android USB Drivers
- Custom ROM downloaded
If you use iMyFone Fixppo for Android, then no need to install Android USB drivers and download ROM.
Before following any of these methods, make sure your bootloader is unlocked and you have Android USB drivers installed for your device. Make sure that your device’s battery is above 50% before doing this.
Prerequisite 1: Installing USB Drivers
Samsung devices:
- Download the Samsung USB drivers from the Samsung developer’s website.
- Extract the zip file by right-clicking it (on windows), choosing “extract all” and then clicking extract.
- Open the extracted folder and run the “.exe” file.
- Click next, choose your language and click install. Wait for the installation to complete and click finish.
MTK Devices:
- Download the Android CDC driver file from online and extract it (right-click, choose to extract all and extract).
- Open device manager by searching for it in Windows or by searching for “device manager” in Control Panel.
- In the device manager, click on your Computer’s name, click on the action button and “Add legacy hardware”.
- Click on the “Next” button, choose the “Install the hardware that I manually select from a list (Advanced)” and click next.
- Choose the “have disk” option, click on “browse”, locate the extracted driver folder and click on the “Android Gadget CDC Driver” file.
- Click on “OK“, “next“, wait for the driver to install and click “finish“.
If you get a Windows security box, click on “Install this driver software anyway”.
Prerequisite 2: Unlocking the Bootloader
Samsung devices come with an unlocked bootloader, so you do not need to follow these steps. Here is a general guide.
- Download and install Android SDK tools.
- Download the drivers for your device (these can be found from your manufacturer’s website).
- Enable developer’s options and then enable USB Debugging in the developer’s options menu on your device.
- Get the unlock key for your device from your manufacturer’s website.
- Use command prompt to unlock the bootloader via fastboot commands.
Searching Google for your device’s bootloader unlocking method will give you a more in-depth method that you can follow.
Part 3. How to Flash Android Phone using PC Software
We will introduce 3 PC software here. A complete guide will be offered for each method. You can check the chart below to know the differences between them and choose a method you like.
| iMyFone Fixppo | SP Flash Tool | Odin | |
| Success Rate | High | Medium | Medium |
| Need install USB Driver or Not | No | Yes | Yes |
| Need Search & Download ROM or Not | No | Yes | Yes |
| Ease of Use | Easy | Complicated | Complicated |
| Time Needed | Around 10 minutes | Hours | Hours |
Method 1: Flashing via iMyFone Fixppo (Easiest + Fastest)
This is the easiest and fastest method for flashing Android firmware onto your device. iMyFone Fixppo for Android will work with android phones that are completely dead and requires no expert knowledge in Android. It is an Android system repair tool, but also an android flash tool.
- Download Fixppo for Android on your Windows PC.
- Launch Fixppo and click start on the software to continue.
- Fill in the details regarding your Android device on the software and click “Download Firmware”. This will download and extract the firmware for your phone automatically without you having to do anything else.
- Confirm the information once the firmware has been downloaded and press start.
- Put your device is in Download mode (follow on-screen instructions).
- Connect your device to your PC to begin the flashing process.
- The process will start. The Fixppo software will automatically flash your phone and complete the whole process. Leave your phone until it reboots, as this happens when problems have been repaired on your device.
- Disconnect your device from the PC and use it as normal.
That is all you need to do using Fixppo. This is the easiest and best method for repairing your android device (phone or tablet) and to repair it so that you can continue to use it as previously.
Besides, iMyFone Fixppo for Android has been trusted by many individuals and websites. Thousands of people have already tried Fixppo for Android and can solve various complex Android system issues.
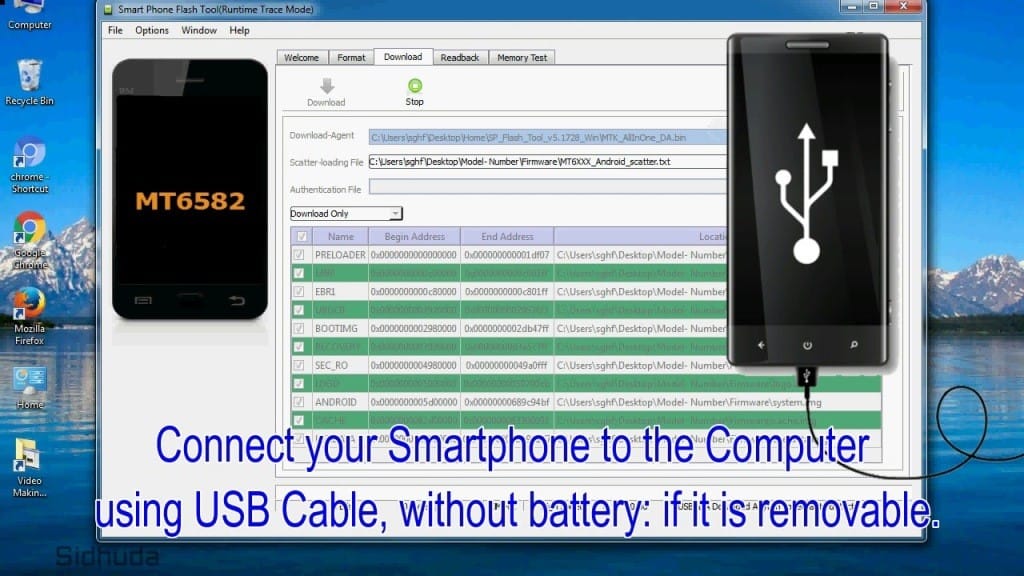
Method 2: Flashing via SP Flash Tool (MediaTek Devices) (Difficult)
- Power off your android device completely and remove the battery if it is removable.
- Download the ROM you want to flash your phone with (make sure the ROM is compatible) and extract the files.
ROM files from websites such as XDA developers are usually reliable.
- Download the SmartPhone (SP) Flash Tool on your computer.
- Extract the zip file by right-clicking on the .zip file and choose “extract all”.
- Open the folder that has been extracted, find “flash_tool.exe” in the folder and run the file.
- When the tool has been executed, click on the “Download” tab if it hasn’t already been selected.
- When you are in the download tab, click on the “Choose” button on the line which says “Scatter-loading File”.
- Locate your extracted ROM, go into the “Firmware” folder and select the “.txt” file that contains the word “Scatter”.
- Once the file has been processed, click on the “Download” button.
- Connect your phone (make sure the power is turned off and the battery is removed if possible) and a volume key to make sure your phone has been recognized by the PC.
- Once completed, exit the SP flash tool and disconnect your phone.
Your phone has now been flashed to your desired ROM. Reboot your phone and you can now use your device normally.
Method 3: Flashing via Odin (Samsung Devices) (Difficult)
- Download the ROM you would like to install and extract it on your PC.
You can download the ROM from a range of websites, such as Sammobile. Make sure the ROM is compatible with your device.
Note: Do not downgrade your version of Android. Always upgrade the version as it will cause issues with your device.
- Download, extract and install Samsung USB Drivers on your PC.
- Download and extract the latest version of Odin on your PC.
- Put your phone in Download mode
- For devices with a physical home button: Power off your device. Hold down the volume down and home button keys simultaneously. When you get a screen with a warning, press the volume up key to put your device in download mode.
- If your device does not have a physical home button: Power off your device. I will be using the S8 as an example. Press and hold the Bixby and volume up buttons. Then press the power button until the power turns off. Release the buttons once a blue screen appears. Press the volume up key to boot into download mode.
- If these methods do not work on your device, a quick search online will confirm how to boot into download mode.
Search: Phone model + download mode
- Connect your phone to the PC via a USB cable.
- Launch the Odin software (it will be in the folder that you have extracted). You will see your device under the “ID: COM” label if connected.
- Once Odin is launched, click on the “AP” button. Browse into your extracted ROM folder through the Odin popup browser and click on the file located inside the ROM folder.
- Wait for the file to be added to Odin.
- Click on the Start button at the bottom of Odin and wait for the ROM to be flashed.
- Your phone will reboot and finalize the installation of the software.
- When your phone has completed the installation, disconnect your phone.
In short, using the Fixppo software is the quickest and easiest way for you to flash firmware onto your device. The other methods require you to download the firmware in advance and require more skill when flashing. This can lead to more errors and you potentially risk bricking your device.
[Most Complete Guide]
Do you need to flash your Android phone? There are a lot of methods you can follow to flash your smartphone. However, it is safe to say that it is a tricky thing to try on your own, because if a single thing goes wrong, you might end up damaging your precious phone permanently.
So, is there any way you to do this without any risk? Luckily, we have got your back. And, today, in this post, we will share some of the best and easiest methods of flashing your Android phone. By following these methods (carefully), you will be able to flash your Android smartphone without a hitch. Without wasting more words, let’s cut to the chase…
- Part 1. Why Do You Need to Flash a Phone?
- Before you flash phone— Try hard resetting
- Part 2. How to Flash Your Android Phone
- Preparation: Back up files on an Android phone
- i
- Method 1: Use an easy-to-use tool to flash your phone
- Method 2: Flash Android manually with custom ROMs
Part 1. Why Do You Need to Flash a Phone?
Prior to flashing your phone, you should know the reasons behind flashing a phone. There are several situations where you must flash your Android phone. But, here we will be sharing only a couple of those. If you are in these situations, then you have to flash your phone by following our methods which we will be sharing on this post later. So, let’s see those reasons…
- To fix phone stuck, bricked, dead, or locked issues:
We love Android phones because of their customizability and flexibility. However, since Android is open-source, it is also the most vulnerable to many operating system related issues. It is a familiar scenario that your phone might get stuck or get bricked out of nowhere. There are various fixes to these issues. However, the ultimate solution to these serious issues is to flash your phone.
- To install new custom ROM:
Normally, your Android phone will come with a default OS (Operating System)/ROM. For some reasons, most of these stock Android ROMs are not the best option out there. As a result, a lot of people build custom ROMs which can be installed in the place of those stock ROMs.
Interestingly, those custom ROMs come with a bunch of additional features which are not typically available on the default OS. A custom ROM might make your phone faster, offer better battery backup, will give a new look (definitely) and so on. So, you must flash your phone in order to install a custom ROM.
Before you flash phone— Try hard resetting
You should know that flashing a phone has its consequences. First of all, you will lose all of your files and data from your phone. And secondly, you might not like the new custom ROM after installing it. That means you will have to go through the same process over again. Thirdly, sometimes a hard reset might fix a lot of issues automatically. Plus, if you mess up the procedure of flashing an Android phone, you might permanently damage your phone. So, you should try hard reset before going to flashing the phone.
There are hundreds of models of Android phones out there. And, not all of these phones can be reset to the factory settings following the same method. Each one has a different method. As a result, we can’t share all of the available methods. Rather, we will share a basic method, which will be almost similar to all the methods available. So, here we go…
How to Hard Reset an Android Phone?
Remark: After a hard reset/factory reset, you will lose all the data from your phone including your apps, pictures, videos, audios, contacts and so on. So, you should take a backup before you do that. We have shared a method of backing up an Android phone down below. You can follow that.
Now, let’s see how to factory reset your Android phone in a step by step manner.
- Navigate to the ‘Settings’ menu on your Android phone
- Then go to the ‘Reset Option’ by navigating to System > Advanced >Reset options
- If you don’t see these options, type in the search bar ‘Reset’ and search
- In doing so, you will find the Reset option
- Next tap on the Erase All Data/ Factory Reset option (Varies depending on the model)
- Then tap on the ‘Reset Phone’ option. Then most of the time, you will need to enter your passcode/ PIN, or password of your phone
- And, at last, tap on the ‘Erase Everything’ option and wait for the procedure to complete
- That’s it. Now, you can see if your problem is fixed
The above steps might be a little different on different devices. For the phones that are bricked or cannot work normally for other problems, remember that there is another way to factory reset your device by using power and volume buttons. However, this method also varies by phone manufacturers. Thus, you should visit your phone’s support site for specific instructions based on your phone model.
Part 2. How to Flash Your Android Phone
Even after resetting your phone to factory settings if the issues still persist, you have no other ways except to flash your phone. Now, there are multiple ways you can flash an android phone. However, almost all of the methods are manual and sophisticated. Thus, it carries a risk of damaging your phone permanently. So, what can you do in this context?
Lucky for you, there are some softwares which can automatically flash your Android phone. The method is also pretty streamlined and there’s no risk trying those softwares at all. In this section, we will share multiple methods of flashing your phone. However, before flashing any phone, you will have to take a backup of the files of that phone. Here’s a common method of taking a backup of Android phones. Besides we will also share some tips on backing up your data down below.
Preparation: Back up files on an Android phone
- Navigate to the Settings app on your phone
- Next, go to System> Advanced > Backup
- If you don’t find these options; just search for ‘Backup’ using the search bar from the top of the Settings menu and tap on the ‘Backup’ option
- Next, tap on the ‘Back up now’ option
- Finally, tap on ‘Continue’ to start backing up
Remember, the process will vary depending on the model of your Android phone. However, using the above method, you will be backing up the settings and the data of your phone to your Google Account. Here are some more tips on this topic.
Tips on backing up data:
- You can copy all the videos, audio, pictures, app data and so on to your PC to take a manual backup
- You can also upload all the data to your personal Google Drive account as well
- Use Google Photos to back up photos instantly
- Use Google Drive account for backing up documents
- You can use Text Message & Call Log backup apps to backup those data. You can find these type of apps on the Play Store
If you have a dead or frozen/dead phone, you can’t take backup this way. Instead, you can try to recover your data using any recovery tools. Then again, it might not be possible. So, it is always better if you turn on online backup. Now, that you have taken back up your phone, we will talk about the easiest and most risk-free method for phone flashing so that you don’t need to try the other risky methods at all. So, here we go…
Method 1: Use an easy-to-use tool to flash your phone
Here, we will show you how to flash your Android phone automatically using a third-party software. The name of the software is iMyFone Fixppo for Android. This software is very easy to use. And, there’s no risk factor using this one as well. Now, let’s see how to flash Android phone using iMyFone Fixppo for Android software. There are only 3 steps to flash your phone using this software. So, let’s go
At first, download the iMyFone Fixppo for Android on your PC and install it if you haven’t already. And launch the app on your PC and click on the ‘Start’ button on the software.
Step 1:On the next page, provide information about your Android phone. After choosing all the correct info, just click on the ‘Download Firmware’ button. In doing so, iMyFone Fixppo for Android will start to download the correct firmware for your phone
Step 2:Now, connect your phone to your PC via USB cable and put it to download mode. Don’t know how to go to download mode? iMyFone Fixppo for Android has the instructions, just follow those carefully
Step 3:Then, iMyFone Fixppo for Android will recognize your phone and will begin to flash your phone automatically. Just wait for the process to finish up. After your phone is successfully flashed, it will restart on its own. Lastly, click on the ‘Done’ button to finalize the procedure
See? That was so simple. Yet, for your convenience, we will share another method of flashing an Android phone down below. Let’s go then…
Method 2: Flash Android manually with custom ROMs
To be noted, this is a manual method. So, if you do something wrong, you can’t reverse it. Thus, we would tell you to try this method if you are familiar with the technicalities. And also, we are not responsible if this method doesn’t work or damage your phone. Do it on your own responsibility. Nevertheless, this method might be a bit tricky but it works most of the time.
Required things:
- Your Android device
- Back up your device, if you haven’t already
- A custom ROM
- Custom Recovery
- Unlocked bootloader
- At least 50% charge on your device
Steps to Follow:
Advertisement
No.1 — Download a Custom Rom:
There are tons of custom ROMs available for each Android phones on the web. So, search and find the one that you like the most. Remember, you need to find the correct ROM for your phone. So, verify that if it’s compatible with your carrier/phone model and so on. And, then download it (.zip file) and save it on your phone.
No.2 — Unlock Bootloader (Optional):
Almost all Android phones come with an unlocked bootloader. However, some manufacturers also lock the bootloader. If that’s the case for you, then you need to contact your phone manufacturer to unlock your phone’s bootloader.
No.3 — Boot into Recovery:
This time, you will need to use recovery combo buttons to boot into the recovery mode. The recovery combo button differs from device to device. You can search on the web for finding information about the specific button combo to enter into recovery mode for your particular device.
However, in most cases, it will be the Volume Down + Power button. So, hold down these two buttons simultaneously for at least 5 seconds. In doing so, your phone will boot into the recovery mode.
No.4 — Finally Flash:
When you are in the recovery mode, you will see a specific screen which will depend on the recovery mode you are using. There are a number of recovery modes available such as ClockworkMod, TWRP, Cyanogenmod recovery, Red Wolf recovery mode and more. However, as the ClockworkMod & the TWRP is the most popular ones, we will share the methods of using these two recovery modes in this section.
So, select ‘Install’ (on TWRP) or ‘Install zip from sdcard’ (on ClockworkMod) option from the recovery mode screen to initialize the procedure. Next, browse and find the custom ROM you have just downloaded earlier.
After you have found and selected the custom ROM (.zip) file, you can install the desired ROM. Select the ‘Swipe to Confirm Flash’ (on TWRP) or ‘Apply sdcard/update.zip’ (on ClockworkMod) option. In doing so, your phone will be flashed with this new custom ROM momentarily.
No.5 — Clear the Cache:
After you have flashed your phone, you can wipe the cache data on your phone. Just go back on the recovery mode, and select ‘Wipe cache partion’ option to wipe all the cache on your Android phone.
Congratulations! Give a pat yourself on the back because you have manually flashed your android device. However, there are some other methods which you can also use to flash any Android.
For those methods, you will need a PC and a specific set of software (Flash Tool) based upon your phone brand. We won’t share all these methods. Yet, we will share a few names of the most popular flash tools down below. So if you need them, you can find them on the web.
- Odin (For Samsung devices)
- Nexus Root Toolkit (For Nexus devices)
- SP Flash Tool (For Mediatek Chipset)
- FlashTool (For Sony Xperia devices) and so on
- Miracle Box (For Chinese brands)
Summary
In this post, we have shown various methods of flashing an Android phone. All these methods are viable. But, some are better than the others. Also, depending on the situation, some are riskier than the others. However, we try to offer the best solution to our readers.
We want to tell you that it is best to use the iMyFone Fixppo for Android software for this purpose, because it does not require you to have any technical experiences to use this software. Also, it is the most risk-free and safest method of them all. And, lastly, it can be used with any Android phone brands.